
Monitor temperature and humidity from anywhere in the world! This comprehensive tutorial walks you through setting up Arduino IoT Cloud with DHT11 sensor and creating a beautiful real-time dashboard for remote monitoring.
Introduction
The Internet of Things (IoT) has revolutionized how we interact with the physical world. This comprehensive tutorial shows you how to setup a DHT11 temperature sensor Arduino project with IoT Cloud for remote monitoring from anywhere in the world. We’ll use the DHT11 sensor to measure temperature and humidity, then display these readings on a cloud-based dashboard accessible via web browser and mobile app.
What you’ll achieve by the end of this tutorial:
- Real-time temperature monitoring in Celsius/Fahrenheit
- Real-time humidity monitoring
- A customizable cloud dashboard accessible from any browser
- Mobile app access for on-the-go monitoring
Components Required
Before we begin, gather the following components:
| Component | Quantity | Purpose |
|---|---|---|
| ESP8266 NodeMCU or ESP32 | 1 | Main microcontroller with WiFi |
| DHT11 Sensor (3-pin or 4-pin) | 1 | Temperature and humidity sensing |
| Jumper Wires | 3-4 | Connections |
| Breadboard | 1 | Prototyping |
| Micro USB Cable | 1 | Power and programming |
| 10K Ohm Resistor | 1 | Pull-up resistor (if using 4-pin DHT11) |
Note: If you’re using a 3-pin DHT11 module, it typically has a built-in pull-up resistor, so you won’t need an external one.
Understanding the DHT11 Sensor
The DHT11 is a digital temperature and humidity sensor that provides calibrated digital output. It’s an excellent choice for hobbyists due to its low cost and simplicity.
DHT11 Specifications:
- Temperature Range: 0°C to 50°C (±2°C accuracy)
- Humidity Range: 20% to 80% RH (±5% accuracy)
- Operating Voltage: 3.3V to 5V
- Sampling Rate: 1 Hz (one reading per second)
Pin Configuration (3-pin module):
- VCC (+): Power supply (3.3V or 5V)
- Data (S/OUT): Digital data output
- GND (-): Ground
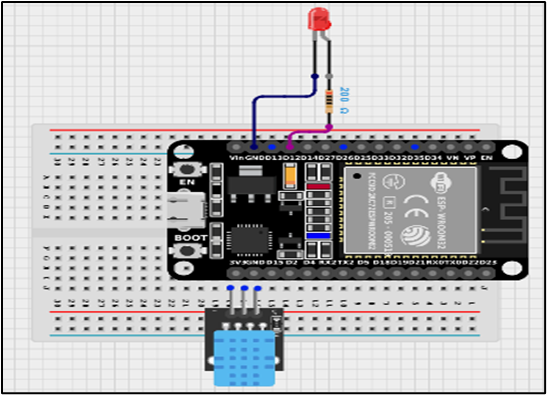
Circuit Diagram & Wiring
Creating an Arduino IoT Cloud Account
Step 1: Open your web browser and navigate to cloud.arduino.cc
Step 2: Click on “GET STARTED FOR FREE” button
Step 3: If you don’t have an account, click on “Create one”
Step 4: Fill in the required information:
- Enter your birthday
- Click “Next”
- Provide your email ID, username, and set a password
- Click “Sign Up”
Step 5: Verify your email address by clicking the confirmation link sent to your inbox
Step 6: Once verified, log in and click on “IoT Cloud” from the main menu to access the IoT dashboard
Installing Arduino Cloud Agent
The Arduino Cloud Agent is essential software that enables communication between your web browser and the physical Arduino/ESP boards connected to your computer.
Step 1: In Arduino IoT Cloud, when you try to add a device, you’ll be prompted to install the Agent. Alternatively, visit the download page directly.
Step 2: Click the “Download” button for your operating system
Step 3: Install based on your operating system:
For Windows:
- Double-click the downloaded
.exefile - Click “Yes” when prompted for administrator permission
- Follow the on-screen installation wizard
- Click “Install” and wait for completion
For macOS:
- Double-click the
.dmgfile - Drag the ArduinoCreateAgent.app into the Applications folder
- Open the app and grant necessary permissions
For Linux:
- Extract the
.tar.gzarchive - Run the installation script
- Follow terminal instructions
Step 4: After installation, the agent will run in your system tray (Windows) or menu bar (macOS). Look for the Arduino icon to confirm it’s running.
Adding Your Device to Arduino IoT Cloud
Now let’s register your ESP8266 or ESP32 with the Arduino IoT Cloud.
Step 1: In the Arduino IoT Cloud interface, click on the “Devices” tab in the left sidebar
Step 2: Click on the “+ ADD DEVICE” button
Step 3: You’ll see two options – select “Set up a 3rd Party Device” (since ESP8266/ESP32 are not official Arduino boards)
Step 4: Choose your device type from the dropdown menus:
- For NodeMCU: Select ESP8266 → NodeMCU 1.0 (ESP-12E Module)
- For ESP32: Select ESP32 → Choose your specific board model
Step 5: Give your device a recognizable name (e.g., “DHT11_Weather_Monitor” or “Home_Temperature_Sensor”)
Step 6: ⚠️ CRITICAL STEP: A window will display your Device ID and Secret Key
- Click “Download PDF” to save these credentials
- Alternatively, copy and paste them to a secure location
- The Secret Key is shown only once and cannot be recovered!
Step 7: Click “Continue” to complete the device setup. Your device will now appear in the Devices list as “Offline” until we configure and upload code.
Creating a Thing and Adding Variables
A “Thing” in Arduino IoT Cloud represents your physical device and its associated cloud variables (properties).
Step 1: Navigate to the “Things” tab in the left sidebar
Step 2: Click “+ CREATE THING” button
Step 3: Give your Thing a descriptive name (e.g., “Temperature_Humidity_Monitor”)
Step 4: Associate your device:
- Find the “Associated Device” section
- Click “Select Device”
- Choose the device you added in the previous step
- Click “Associate”
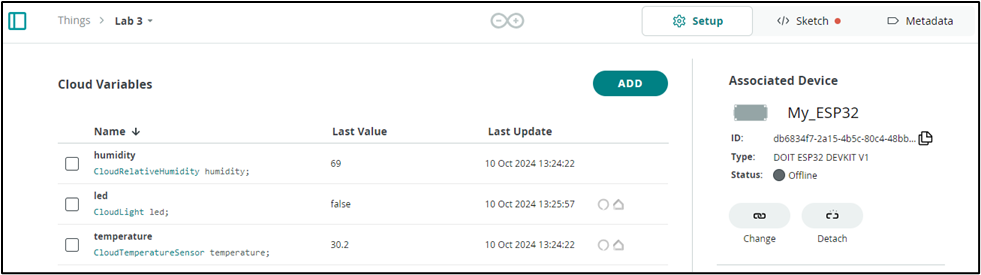
Step 5: Now add cloud variables for temperature and humidity:
Adding Temperature Variable:
- Click “+ ADD VARIABLE” button in the Cloud Variables section
- Name:
temperature - Variable Type: Select “Floating Point Number”
- (Or select “Temperature Sensor (°C)” if you want Alexa compatibility)
- Variable Permission: Select “Read Only” (sensor sends data, doesn’t receive)
- Variable Update Policy: Select “On Change”
- Set threshold to 0.5 (updates when temperature changes by 0.5°C)
- Click “Add Variable”
Adding Humidity Variable:
- Click “+ ADD VARIABLE” again
- Name:
humidity - Variable Type: Select “Floating Point Number”
- (Or select “Relative Humidity (%)” for smart home compatibility)
- Variable Permission: “Read Only”
- Variable Update Policy: “On Change” with threshold of 1
- Click “Add Variable”
Configuring Network Settings
Your device needs WiFi credentials to connect to the internet.
Step 1: In your Thing configuration page, find the “Network” section
Step 2: Click “Configure” button
Step 3: Enter your WiFi credentials:
- WiFi SSID: Your WiFi network name (case-sensitive!)
- WiFi Password: Your WiFi password
Step 4: Enter the Secret Key you saved when adding your device
Step 5: Click “Save” to store the network configuration
Important Notes:
- The SSID is case-sensitive – “MyWiFi” is different from “mywifi”
- ESP8266 only supports 2.4GHz WiFi networks (not 5GHz)
- Ensure your WiFi password doesn’t contain special characters that might cause issues
Writing and Uploading the Code
Arduino IoT Cloud automatically generates a basic sketch based on your Thing configuration. We’ll modify it to include DHT11 sensor reading.
Step 1: In your Thing page, click on the “Sketch” tab
Step 2: You’ll see the auto-generated code structure with thingProperties.h already included. The basic structure looks like this:
#include "thingProperties.h"

void setup() {
  Serial.begin(9600);
  delay(1500);
  initProperties();
  ArduinoCloud.begin(ArduinoIoTPreferredConnection);
  setDebugMessageLevel(2);
  ArduinoCloud.printDebugInfo();
}

void loop() {
  ArduinoCloud.update();
  // Your code here
}
Step 3: Add the DHT11 library. Click on “Libraries” (book icon) in the left panel, search for “DHT sensor library” by Adafruit, and click “Include”
Step 4: Modify the code to read from the DHT11 sensor. Replace the sketch content with:
#include "thingProperties.h"
#include <DHT.h>

// ============== DHT11 CONFIGURATION ==============
#define DHTPIN 2          // GPIO2 = D4 on NodeMCU
#define DHTTYPE DHT11     // Sensor type: DHT11

// Create DHT sensor instance
DHT dht(DHTPIN, DHTTYPE);

// Timing variables
unsigned long previousMillis = 0;
const long interval = 2000;  // Read sensor every 2 seconds

void setup() {
  // Initialize Serial Monitor for debugging
  Serial.begin(9600);
  delay(1500);  // Wait for Serial Monitor to initialize

  Serial.println("================================");
  Serial.println("DHT11 IoT Cloud Monitor Starting");
  Serial.println("================================");

  // Initialize DHT11 sensor
  dht.begin();
  Serial.println("✓ DHT11 sensor initialized");

  // Initialize Arduino IoT Cloud properties
  // Defined in thingProperties.h (auto-generated)
  initProperties();

  // Connect to Arduino IoT Cloud
  ArduinoCloud.begin(ArduinoIoTPreferredConnection);

  // Set debug message level (0 = off, 4 = max verbosity)
  setDebugMessageLevel(2);
  ArduinoCloud.printDebugInfo();

  Serial.println("✓ Connecting to Arduino IoT Cloud...");
}

void loop() {
  // Maintain connection with Arduino IoT Cloud
  ArduinoCloud.update();

  // Check if it's time to read the sensor
  unsigned long currentMillis = millis();

  if (currentMillis - previousMillis >= interval) {
    previousMillis = currentMillis;

    // Read humidity and temperature from DHT11
    float h = dht.readHumidity();
    float t = dht.readTemperature();      // Celsius
    // float f = dht.readTemperature(true); // Fahrenheit (uncomment if needed)

    // Validate sensor readings
    if (isnan(h) || isnan(t)) {
      Serial.println("✗ ERROR: Failed to read from DHT11 sensor!");
      statusMessage = "Sensor Error";
      return;
    }

    // Update cloud variables
    temperature = t;
    humidity = h;
    statusMessage = "Sensor OK";

    // Print readings to Serial Monitor
    Serial.println("------ Sensor Reading ------");
    Serial.print("Temperature: ");
    Serial.print(t);
    Serial.println(" °C");
    Serial.print("Humidity: ");
    Serial.print(h);
    Serial.println(" %");
    Serial.println("Data sent to cloud ✓");
    Serial.println("----------------------------");
  }
}
Step 5: Connect your ESP8266/ESP32 to your computer using the micro USB cable
Step 6: Select the correct board and port:
- Click on the board dropdown (top of editor)
- Select your board (NodeMCU 1.0 or ESP32)
- Select the correct COM port (e.g., COM3, /dev/ttyUSB0)
Step 7: Click the Upload button (right arrow icon) to compile and upload the code
Step 8: Wait for the upload to complete. You’ll see progress in the output console:
- “Compiling sketch…”
- “Uploading…”
- “Upload complete”
Step 9: Click on “Serial Monitor” tab to verify the connection:
- Set baud rate to 9600
- You should see:
- “Connecting to WiFi…”
- “Connected to Arduino IoT Cloud”
- Temperature and humidity readings